Tuesday, December 28, 2010

編みぐるみ 大きな忍者トトロ Amigurumi Big Ninja Totoro

クリスマスは楽しく過ごせましたでしょうか?
太い毛糸で大きな忍者トトロを編んでみました。
白目と黒目の比率がばっちりです。
How was christmas?
I made a big ninja totoro with thick yarns.
This time, the ratio of white and black eyes are perfect.

このままどんどん大きくなるかというとそうでもなく
この次に作った子はミニトトロよりも小さい
ミニミニトトロになりました。
次回にでも紹介させて頂きます。
It seems like this ninja totoros are getting
bigger and bigger but actually not.
I already made next one and is the smallest ever.
I will write about it tomorrow.

Friday, December 17, 2010

編みぐるみ ミニ忍者トトロ Amigurumi Mini Ninja Totoro

年末ですのでわたわたと慌ただしいですね。
そんな中、黒いミニトトロを編んでみました。
ミニ忍者トトロです。
It's the last month of the year 2010!
Everybody must be very busy.
Anyway, I made a crochet black mini totoro.
Mini Ninja Totoro.

ちょうどこの大きさの黒目しか持ってなかったのですが
本来はもっと小さいものです。
中にはペレットを底に入れているので
倒れたりしません。
I should have used smaller black eyes but these are
the smallest I had (I thought I had them before).
And I put poly pellets inside bottom
so he won't fall down.

25セント玉と大きさ比較。
ちょうど良いサイズに仕上がったと思います。
次は違う種類の毛糸で編んでみたいですね。
A quarter for size comparison. 
I think this is the perfect size.
I want to make another one with different types of yarns.

Monday, November 29, 2010

編み物 ドミノ編みのモチーフ Crochet domino motif

時間がある時にかぎ針のドミノ編みモチーフを
コツコツと作り溜めています。
シンプルなブランケットを作りたいのです。
かなりの数編まないといけないので
完成がいつになるか分かりませんが
ゆっくり楽しんで編み上げたいと思います。
今はもうこの箱が一杯になっています。
I am making crochet domino motif
whenever I have time to crochet.
I'd like to make a simple blanket with these motif.
I need to crochet tons of them in order to
make a blanket.
I don't know when I can finish this
but I'd like to enjoy the work.
I already filled this box with motif.

Tuesday, November 23, 2010

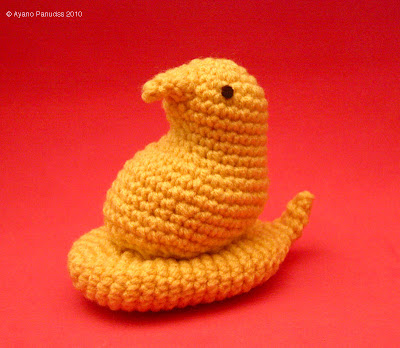
編みぐるみ ピープスヒヨコ Amigurumi Peeps Chick

風邪はもう少しマイナーな症状がありますが
かなり良くなってきました。
そんな中、気分は春な編みぐるみを作りました。
ピープスのヒヨコです。
イースターのお菓子として有名です。
我ながらとてもよく出来たと思います。
I still have minor symptoms but feel much better.
Anyhow, I made this spring-reminder amigurumi.
It's a peeps chick.
Famous for the easter treat.
I think I did a great job.

チャーミーが喜んで飛びつきました。
私はこのピープスがとても好きです。
次はピープスのうさぎを作る予定です。
Charmy got so excited and jumped on it.
I really like peeps.
I am going to make peeps bunny next.

Monday, November 15, 2010

編みぐるみ ピーターラビットカラーの赤ちゃんうさぎ Amigurumi Peter Rabbit colored baby bunny

また風邪をぶり返しました。
今回の風邪はとにかく熱がよく出て
たくさん汗をかきました。
I have a relapse of cold.
I felt always hot and sweat a lot
due to the fever.

そんなこんなですが、やっとピーターラビットカラーの
赤ちゃんうさぎが完成しました。
あのコーヒー染色した毛糸を使っています。
顎の下からお腹にかけて、手足の先裏、それと
シッポの裏側は白で色替えしました。
Anyway, the Peter Rabbit colored baby bunny has
finally completed!
As you can see, I used coffee-dyed yarn I wrote here 
on the other day.
I changed the color of under the chin to belly,
palms and sole of the foot, and back of the tail to white.

とても可愛い子です。
目は黒なのですが、その周りは青です。
耳の内側もちゃんとピンクで色替えしてあります。
It's a very cute boy :)
His eye pupils are black but the iris are blue.
I changed the color of the inside of the ear pink.

ハートのエコたわしと一緒に。
見上げるポーズがとても可愛いのです。
With a heart dish cloth.
I like his "looking-up" face very much.

いつもはちびうさにニンジンのおまけをつけるのですが
今回はこの素朴な花束をつけます。
I usually let these baby bunnies carry
amigurumi carrot but this one will have this
simple flowers.

ご機嫌に鼻歌なんか歌いながら
どこかへ歩いていきそうです。
He looks like he is in a good mood and
 walks away with humming a happy tune.

Monday, November 08, 2010

市松人形カスタム Ichimatsu boy doll customize 下半身3 Lower body3

アキラ君の下半身はあとちょっとで完成です。
上の切り口を整え、細かい部分も左右対称にしていきます。
My ichimatsu boy's lower body is about to complete.
I leveled top edge even and still working to
make it symmetrical.

この人形は自立することを前提としていないのですが
しっかり左右対称に作るように心がけております。
I'm trying very hard to make this doll body symmetrical
even though this is not going to be able to stand
by itself.

お尻も綺麗に出来ました。
I think I did a good job on his hips.

これは私の友達が作ってプレゼントしてくれた
小さなお皿です。
白地にミルフィオリの春らしい可愛いお皿と
黒地にキラキラ大きめガラスのしっとりとしたお皿です。
とても綺麗で何をのせようか考えるだけで
ワクワクしてきます。
These are my friend's handmade
small glass plates.
White based plate with spring color millefiori and
black based plate with big shiny color accents.
They are so pretty and make me happy to think
what should I dish up!

Friday, November 05, 2010

ミニチュア 絵画「オイディプスとスフィンクス」 Miniature Painting "Oedipus and Sphinx"

以前ここにちょこっと書いたのですが
私の作った編みぐるみ「リアル・ホーランドロップの赤ちゃんうさぎ」と
交換する約束で、お友達の画家さんに
私の好きなモローの「オイディプスとスフィンクス」の
ミニチュアの絵画を描いてもらう約束をしました。
先日、お約束の品が届いたので紹介させて頂きます。
どうですよ、この素晴らしさ!
As I mentioned the other day, I sent my "real Holland Lop
baby bunny amigurumi" to my painter friend in Japan, who
promised me to paint my favorite painting
"Oedipus and Sphinx" by Gustave Moreau
in a dollhouse miniature size for the trade.
I receieved it couple days ago, so let me introduce.
How do you think? Isn't it gorgeous?

比較の5円玉を隣に置いてみました。
絵画のサイズは4.1cmX8.5cmです。
こんなに小さいのに本物そっくりです。
手描きで下絵の段階から見ていたのですが
幾重にも絵の具を重ねてここまでリアルに再現して下さいました。
額も作って頂きました。
またこの額がゴージャスで、絵画をとても良く
引き立ててくれています。
I placed a quarter next to the painting so that you can see
how small and intense it is.
The size of the painting is 4.1cmX8.5cm(1 5/8inX3 5/16in).
It is exactly the same as the real one, though it is so small.
I had a chance to see the process of this painting and
it was just amazing to see how the layers of the paints
it needed to be real like this.
He also made this gorgeous frame.
I really like this frame, it sets the painting off to advantage well.

この絵を描いてくれたのは岡田昌也さんという
愛知県の画家さんです。
絵画教室もやっておられます。
HPには岡田さんの作品(大きな絵画)や
今迄に描かれたミニチュア絵画が見られますので
是非ご覧くださいませ。
ブログはこちら
The name of the painter (my friend) is Mr. Masaya Okada
who lives in Aichi pref. Japan.
He also holds painting classes and is teaching.
You can see his main works and miniature paintings 
at his HP (click his name above) and blog
so please go and check them.
His blog is here.

壁に飾っておいたらチャーミーがやってきて
いかにも「自分が描きました!」みたいな真似事を始めました。
I placed the painting on the wall and then Charmy came
and pretends like he painted it.

誰も褒めてないのに照れるチャーミーであった。
Charmy poses proudly in front of the painting.

Sunday, October 31, 2010

ハッピー☆ハロウィン Happy*Halloween

久しぶりに風邪をひいてしまいました。
動きがロボットのようになりました。
風邪の間はかぎ針でドミノ編みなんぞやっておりました。
It's been a long time since I caught cold.
I couldn't help moving like a robot due to the fever.
I was crocheting domino motif while I was sick.

それはそうとハロウィンですね!
チャーミーとリリちゃんも仮装しています。
パンプキンキングと化猫です。
Anyway, Happy Halloween!
Charmy and Lili dressed up for it.
Pumpkin King and Cat Monster.

あくまでうさぎですから。
I am nothing more than a bunny.

Monday, October 18, 2010

市松人形カスタム Ichimatsu boy doll customize 首の受け Neck Socket

首の関節の受けを作ります。
まずは高さを決めます。
Now I am going to make a neck joint socket.
 I need to decide the height of the neck first.

個人的に首が長い方が好きなのですが
子供の市松人形なので短めにします。
I personally like the long neck but
since this is a boy let it be relatively short.

内側から。
Inside view.

球にラップを巻いて受けを作ります。
Wrap the hemisphere to protect it 
and make a socket.

受けの粘土が乾燥した所です。
まだ完成ではありません。
This is after the clay has dried; not complete yet.

Saturday, October 16, 2010

市松人形カスタム Ichimatsu boy doll customize 首2 Neck2

非常に小さな変化しか見られないのですが
アキラ君のボディは少しずつ出来ていっています。
You only see tiny differences in Ichimatsu boy custom process
but it is in progress.

首に半球をつける作業のため、日々こうして
ストッキングをかぶせられるアキラ君
途端に表情が消え生気がなくなります。
I have to cover his face with the stocking 
to prevent scratches and clay dust
but once I put a cover on, he becomes expressionless
and spiritless.

綺麗に半球をとりつけました。
首との段差も粘土で埋め
きっちり均しました。
This is after the addition of the hemisphere to the neck.
I filled up the gap between the neck and the hemisphere
with clay and even out.

Friday, October 15, 2010

編みぐるみ ピーターラビットカラー・プロトタイプ Amigurumi Peter Rabbit color prototype

毛糸のコーヒー染色に成功したので、次は編み図を制作します。
毛糸の色替えがたくさんあるのです。
プロトタイプを編みながら、編み図を書いていきました。
Since I succeeded yarn dye with coffee, I need to draw a 
crochet pattern of the Peter Rabbit color baby bunny next.
There will be several yarn color switchings.
I drew the pattern with making a prototype.

で、これが出来ました。
Then here we go.

白目がうちのセバスチャンを彷彿とさせます。
The white part of the eye ball reminds me of my bunny Sebastian.

耳、口元、お腹、手足の裏、しっぽを色替えです。
ちびうさなので1目で大きな差が出てきます。
There are yarn color switchings at ears, around the mouth
belly, palms, soles, and tail.
One single crochet makes great difference 
since this is a tiny baby bunny.

とても可愛く出来ました。
So pretty.

後姿。
From the back view.

小さいニンジンを追いかけます。
Chasing tiny carrot.

ニンジンを小脇に抱えて。
可愛く出来たので、これをあのコーヒー染めした毛糸で
編んでみようと思います。
Carrying a carrot under his arm.
I will make this bunny with the coffee colored yarn.


Tuesday, October 12, 2010

毛糸のコーヒー染色 Yarn dye with coffee

友達がリアルちびうさのピーターラビットカラーが欲しい
ということで、毛糸をコーヒー染色することにしました。
この毛糸はあまり色の展開がないのです。
上の画像は1回目の染色が終わった時のものです。
1回目は烏龍茶、黒茶、コーヒーのだしがらを
煮詰めたものを使いました。
そしたらキャメル色というには黄色みが足りない。。。
ミルクティーのような色に染まりました。
My friend asked me to make a real baby bunny amigurumi
with peter rabbit color, so I decided to dye the yarn
with coffee.
This particular yarn is my favorite but there are
only a few color variation.
I first used used oolong tea bags, black tea bags, and coffee grounds.
The picture above is after the first dye.
It looks like a faded camel color, needs more yellow. 

ということで、2回目の染色をすることにしました。
一度完全に乾かしてから染めます。
2回目はコーヒーのだしがらをコーヒーで煮詰めた
特濃の染色液を作りました。
だしがらで染める場合、染めるものと同量の
だしがらが必要になります。
この染色液を作るために毎日がんばって
コーヒーを飲みました。
So I tried second dye.
I once dried the yarn completely then dye.
This time, I needed more thicker and stronger dye solution
so I boiled down as much coffee grounds (once used) in a coffee.
When you do the fabric dye with either coffee or tea
you need the same amount of used coffee grounds or
used tea leaves as the weight of the fabric you are going to dye.
I drank at least two cups of coffee everyday for 2 weeks
for this yarn dye heehee.

染めるものが綿とかならば、コーヒーの液を煮詰める時に
一緒に鍋に放り込んで煮て染められるのですが
この毛糸はポリエステル67%・ナイロン33%ですので
煮ることが出来ません。
煮詰めた液に色落ち防止の塩を入れた後に火をとめ
よく冷ましてから毛糸を浸します。
浸す期間は30分から一晩と、染める素材によって
違ってきますが、私は1日半このまま放置しておきました。
一つ上の画像(浸したばかりの)と比べると
色が毛糸によくしみ込んでいるのが分かります。
If you are going to dye cotton fabrics
you can throw them into the boiling coffee solution and
let it boil for a while but this yarn is made up of
67% polyester and 33% nylon so it cannot be boiled.
I added a pinch of salt into the solution, which will
fix the color, then turned off the gas.
Let it cooled down and soaked the yarn in.
Soaking duration varies depends on the type of fabrics or yarn.
I left it for a day and half.
You can see the yarn soaked up the coffee color well with the pictures
above (after a day and half) and the one up above (which is
right after the soak).

水でよくコーヒーを洗い流します。
コーヒー色の水が出てこなくなるまで洗います。
あれだけ濃かった色がここまで落ちます。
逆に言うと、コーヒーではこれくらいが限界なのです。
Then wash off the coffee solution with running water 
until the coffee color water doesn't come out 
from the yarn.
Surprisingly, the dark coffee color has faded to
this level of lightness.
In other words, this is the limit of color strength
of coffee dye (also tea dye).

それから洗濯物の柔軟剤をとかした水に
毛糸をしばらく浸して水で洗い流します。
In the end, I soaked the yarn in the water with fabric softener
for a while and washed with water.

よく乾燥させて完成!
とても良い色に染まりました。
隣に元の毛糸を吊るして色の違いを分かり易くしてみました。
Let it dry completely and finished!
It turns out really nice color.

1回目の染色後と2回目の染色後の比較写真です。
ミルクティーからコーヒーミルクくらいの変化がありました。
この毛糸を使って赤ちゃんうさぎの編みぐるみを作ります。
紅茶染めやコーヒー染めは使ったお茶葉の種類や豆によって
色が違ってきますので
色々試してみると楽しいかもしれません。
These are the first dye and second dye comparison pictures.
It became coffee milk from tea with milk.
I am going to make a real baby bunny amigurumi with this yarn.
Tea dye and coffee dye give you different color
depending on the tea leaves and coffee beans used
so it might be fun to try with other kinds of them.

Friday, October 08, 2010

市松人形カスタム Ichimatsu boy doll customize 首 Neck

アキラ君の首をいじっています。
ずっとどうやって首と上半身を繋げるか悩んでいました。
元は太い針金が1本突き刺してあって
首の切り口は平らでボンドでくっつけられていました。
粘土で固定してもいいのですが、どうせなら少し首が
動かせた方がいいなと思い、半球をつけて球体関節っぽく
してみることにしました。
頭が石膏で出来ているのでとても重く、とてもゴムで
繋ぎ止めることは出来ないので、どうにか他の方法を
とろうと思っています。
Now I'm working on Akira-kun's neck part.
I have been thinking how I can connect his head to the body.
Originally, there was a thick wire stuck from the head to body
and the edge of the neck was flat and was glued to 
urethane foam body.
It is okay to fix the neck to the body with clay
but I wanted something more, thought it is better
if his head moves so I decided to make it like ball jointed doll's neck
(not precisely same but similar).
Since his head is made of plaster and extremely heavy
it is impossible to use rubber band for connecting head and body
so I need to think of using something else.

アキラ君の髪の毛は糊で頭に貼付けられているので
とても作業の邪魔になります。
顔に傷がついたり、粉がついて汚れたりするのを防ぐために
ストッキングをかぶせています。
女の子っぽい顔に見えます。
His hair is glued directly to his head and it disturbs me
and I cannot work.
I'm afraid of scratching his face and make it dirty with
clay dust so I covered it with ankle-length stocking.
He now looks like a girl.

Friday, October 01, 2010

市松人形カスタム Ichimatsu boy doll customize 下半身2 Lower body2

引続きアキラ君の下半身です。だいぶ左右対称になってきました。
I'm still working on Ichimatsu boy's lower body.
It looks more symmetrized compare to the picutre I uploaded last time.

お尻はもっと手を加える必要があります。
I need to work harder on this.

上半身に穴を開け、首を繋げてみました。
アキラ君の表情がグッと市松らしくなりました。
Head and upper body connected to see how it works.
Now he has classical impression which is similar to 
the old ichimatsu possesses.